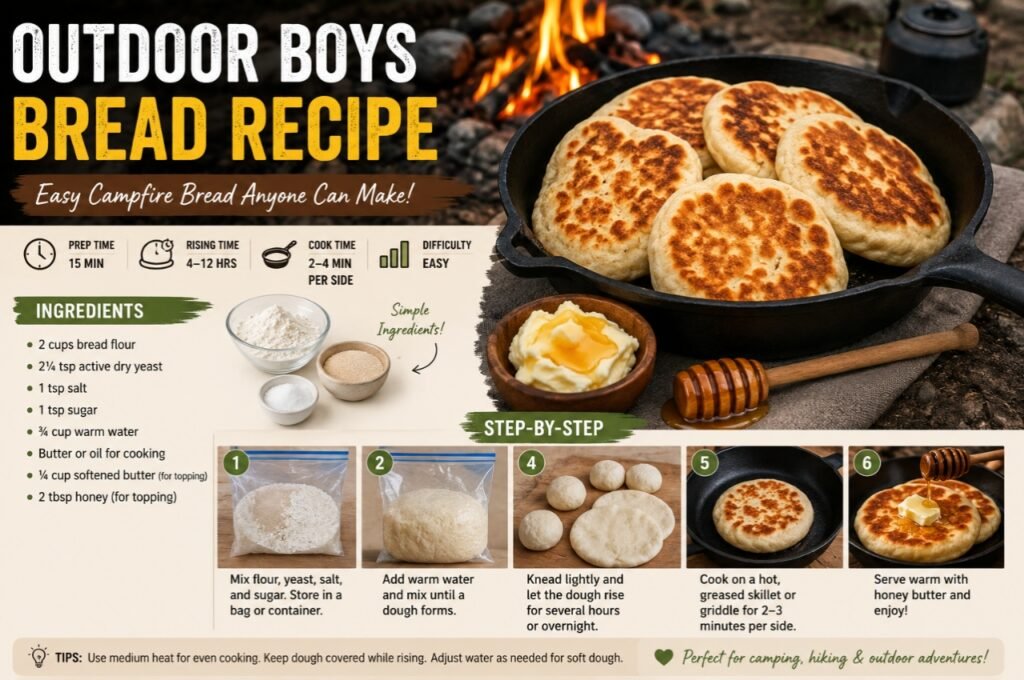

The Outdoor Boys bread recipe is a simple, rustic bread idea made for camping, campfires, backyard cooking, and outdoor adventures. It became especially popular because the method uses basic ingredients and does not require a conventional oven. The original Outdoor Boys campfire-bread video demonstrates several ways to cook bread outdoors, including cooking it on a hot pan or griddle over a fire.
What Is the Outdoor Boys Bread Recipe?
The Outdoor Boys bread recipe is a yeast-based camping bread that can be prepared with flour, yeast, salt, sugar, and warm water. The dough can be mixed at home and packed for a camping trip, or prepared directly at the campsite. One practical version uses a resealable bag for mixing and rising, followed by cooking portions of dough on a hot, lightly greased griddle.
The biggest attraction of this recipe is its simplicity. You do not need a bread machine, stand mixer, or large kitchen. With a bowl or sturdy food-safe bag, a pan or griddle, a little cooking fat, and a controlled heat source, you can make warm bread outdoors.
Why You Should Try This Outdoor Boys Bread Recipe
There are several reasons this camping bread has become such a fun recipe for outdoor cooks. First, the ingredient list is short and inexpensive. Second, the dough is flexible enough to prepare ahead of time. Third, the bread can be cooked without a traditional oven. Finally, freshly cooked bread tastes especially satisfying after spending time outdoors.
The recipe is also useful for beginners because rustic camp bread does not need to look perfectly shaped. Small pieces of dough can be flattened and cooked individually, making the method forgiving and practical.
Outdoor Boys Bread Recipe at a Glance
| Feature | Details |
|---|---|
| Recipe Name | Outdoor Boys Bread Recipe |
| Cuisine Style | Rustic Camping Bread |
| Main Cooking Method | Griddle, skillet, or campfire pan |
| Preparation Time | About 15 minutes |
| Rising Time | Several hours or overnight |
| Cooking Time | About 2–4 minutes per side for small pieces |
| Main Ingredient | Bread flour |
| Yeast | Active dry yeast |
| Best Serving | Warm with honey butter |
| Difficulty | Easy to Moderate |
| Best For | Camping, hiking trips, backyard fires, family outdoor cooking |
Ingredients for Outdoor Boys Bread Recipe
For a simple batch, you can use the following ingredients. The quantities are designed to make a manageable camping batch without requiring complicated measurements.
| Ingredient | Amount | Purpose |
|---|---|---|
| Bread flour | 2 cups | Provides structure |
| Active dry yeast | 2¼ teaspoons | Helps the dough rise |
| Salt | 1 teaspoon | Improves flavor |
| Sugar | 1 teaspoon | Adds mild sweetness and supports fermentation |
| Warm water | ¾ cup | Hydrates the dough |
| Oil or butter | As needed | Used for cooking |
| Softened butter | ¼ cup | For honey butter |
| Honey | 2 tablespoons | For serving |
The basic proportions above reflect a practical version of the camping method, while outdoor cooks sometimes adjust yeast, salt, sugar, and water depending on conditions and desired dough texture.
Step 1: Prepare the Dry Bread Mix at Home
One of the smartest parts of the Outdoor Boys bread recipe is preparing the dry ingredients before leaving home. Measure the bread flour, yeast, salt, and sugar into a clean bowl.
Mix everything thoroughly so the yeast and seasonings are distributed throughout the flour. Transfer the dry mixture into a sturdy food-safe resealable bag or another airtight camping container.
Preparing the dry mixture at home saves time at the campsite. It also means you can keep your camping cooking area cleaner and avoid carrying several separate ingredients.
Step 2: Pack the Dough Ingredients Safely
Once the dry mixture is prepared, seal the bag securely. If you are taking it camping, keep the dry mix protected from moisture.
It is a good idea to label the bag with the recipe name and the amount of water needed. This simple preparation makes the process much easier when you are tired after hiking or setting up camp.
Keep the ingredients away from rain, standing water, and dirty cooking surfaces. Clean food preparation is particularly important when cooking outdoors.
Step 3: Add Warm Water at Camp
When you are ready to make the bread, place the dry mixture into a clean bowl or food-safe resealable bag. Add approximately ¾ cup of warm water.
The water should be warm rather than extremely hot. Very hot water can damage yeast and interfere with fermentation.
Add the water gradually if you are unsure about the exact absorption of your flour. Outdoor conditions can vary, and flour may behave differently depending on humidity and temperature.
Step 4: Mix the Dough
Seal the bag if you are using the bag method and gently knead or squeeze the mixture until the flour absorbs the water.
If you are using a bowl, mix with a spoon or clean hands until a rough dough develops.
At first, the dough may look uneven or sticky. That is normal. Continue working it until the ingredients are incorporated and there are no large areas of dry flour.
The goal is a soft, workable dough rather than a perfectly smooth bakery-style dough.
Step 5: Knead the Dough
Kneading helps develop gluten, which gives yeast bread its structure and chewiness.
If you are making the dough in a bag, knead it carefully through the bag. If you are using a bowl, transfer the dough to a clean lightly floured surface.
Knead for several minutes until the dough becomes more cohesive and elastic. Avoid adding large amounts of flour simply because the dough feels sticky. A slightly soft dough can produce a tender finished bread.
Step 6: Let the Dough Rise
Place the dough somewhere warm and protected while it rises. The dough should become noticeably larger as the yeast ferments.
For a camping trip, the rising time can be several hours or overnight depending on temperature and the amount of yeast used. A commonly described Outdoor Boys-style method involves leaving the dough in a warm part of the tent overnight.
Temperature matters greatly. Cold weather slows yeast activity, while excessive heat can make fermentation happen too quickly.
Step 7: Check Whether the Dough Is Ready
The dough is ready when it has expanded substantially and looks airy.
Do not rely only on the clock. Outdoor temperatures can change dramatically, so the appearance and texture of the dough are better indicators.
If the dough has barely changed after a long period, the environment may be too cold or the yeast may not be active. If it has risen dramatically and started collapsing, it may have fermented for too long.
Step 8: Prepare the Campfire Cooking Area
While the dough is rising, prepare your cooking area.
A griddle, cast-iron skillet, or heavy pan can work well. The goal is controlled heat rather than a huge flame directly underneath the bread.
For campfire cooking, hot coals are generally easier to manage than constantly changing flames. Keep the cooking surface stable and use appropriate fire-safety practices.
Never leave an active campfire unattended, and keep children away from hot cookware and open flames.
Step 9: Divide the Dough
Once the dough has risen, gently remove it from the bag or bowl.
Instead of making one enormous loaf, divide the dough into smaller portions. Smaller pieces are easier to cook evenly on a skillet or griddle.
Take one portion and gently flatten it into a small disk. The thickness can be adjusted depending on whether you want a softer center or a thinner, crispier piece.
Step 10: Heat the Pan
Place your skillet or griddle over a controlled heat source.
Add a small amount of butter or cooking oil. You do not need to flood the pan with fat. A thin coating helps prevent sticking and creates a delicious golden exterior.
Allow the pan to become hot before adding the dough.
Step 11: Cook the Bread
Place the flattened dough onto the hot cooking surface.
Cook for approximately 2–3 minutes on the first side, then turn it over and cook the other side until golden brown and cooked through. The exact cooking time depends on thickness, pan temperature, and outdoor conditions.
Watch the bread carefully because campfire heat can be unpredictable. If the outside becomes dark very quickly while the center remains doughy, reduce the heat and cook more slowly.
Step 12: Flip Carefully
Use a spatula or appropriate camping utensil to turn the bread.
A properly cooked side should have a golden-brown surface with some darker toasted spots. If you see blackened areas developing too quickly, move the pan away from the strongest heat.
Rotating the pan can also help compensate for uneven campfire temperatures.
Step 13: Make Honey Butter
Honey butter is an excellent companion for this rustic bread.
| Honey Butter Ingredient | Amount |
|---|---|
| Softened butter | ¼ cup |
| Honey | 2 tablespoons |
Place the softened butter in a small clean bowl. Add honey and stir until the mixture becomes smooth.
For a sweeter spread, add a little more honey. For a richer buttery flavor, use slightly less honey.
Spread the honey butter over the warm bread immediately after cooking.
Step 14: Serve the Bread Warm
Freshly cooked Outdoor Boys bread is best served warm.
The outside should be lightly crisp and golden while the inside remains soft and chewy. Honey butter melts into the warm surface and adds a sweet, rich flavor.
You can serve the bread as a snack, breakfast side, or accompaniment to a camping meal.
What Does Outdoor Boys Bread Taste Like?
The flavor is rustic, simple, and slightly yeasty. Because the dough contains relatively few ingredients, the bread allows the toasted flour, butter, and fermentation flavors to stand out.
The exterior develops a delicious browned surface when cooked on a properly heated skillet or griddle. The inside can remain soft and pleasantly chewy.
Adding honey butter creates a sweet contrast to the lightly salty bread.
Outdoor Boys Bread Recipe vs Regular Homemade Bread
| Feature | Outdoor Boys Bread | Regular Homemade Bread |
|---|---|---|
| Equipment | Minimal | Often requires oven and baking equipment |
| Cooking | Pan, griddle, or fire | Usually oven |
| Shape | Rustic pieces | Usually loaf |
| Preparation | Flexible | More structured |
| Best Location | Camping/outdoors | Home kitchen |
| Heat Control | More challenging | Easier |
| Flavor | Rustic and toasted | Depends on recipe |
| Cleanup | Minimal if using bag method | Usually more dishes |
Can You Make Outdoor Boys Bread at Home?
Yes. You do not need to wait for a camping trip.
At home, you can prepare the dough in a bowl and cook small portions in a cast-iron skillet or regular heavy pan. You can also adapt the dough to an oven-baked method if you prefer a traditional loaf.
However, the skillet method is especially useful because it maintains the rustic character of the original outdoor cooking idea.
How to Make Outdoor Boys Bread Without a Campfire
If you do not have access to a campfire, use a stovetop skillet.
Heat a heavy skillet over medium heat, add a small amount of oil or butter, flatten the risen dough, and cook each side until golden and fully cooked.
The stovetop method is easier to control than a campfire, so it can be a good option for your first attempt.
Can You Make Outdoor Boys Bread in a Dutch Oven?
Yes. A Dutch oven can be used for outdoor bread cooking, particularly if you want to make a larger loaf rather than individual skillet pieces.
The key challenge is temperature management. Too much heat underneath can burn the bottom before the center is cooked.
Using controlled coals and rotating the Dutch oven periodically can help distribute heat more evenly.
Best Flour for Outdoor Boys Bread Recipe
Bread flour is an excellent choice because its higher protein content helps create a stronger gluten network.
However, all-purpose flour can also work. It may produce a somewhat different texture, but it is convenient when bread flour is unavailable.
| Flour | Result |
|---|---|
| Bread flour | Chewy, structured bread |
| All-purpose flour | Soft, versatile result |
| Whole wheat flour | Heavier and nuttier |
| Rye flour | Stronger, earthy flavor |
| Mixed flour | Balanced texture and flavor |
For a first attempt, bread flour is a dependable choice.
Can You Use Instant Yeast?
Yes. Instant yeast can be convenient for camping because it can generally be mixed directly with the dry ingredients.
Active dry yeast also works. If using active dry yeast, following the package directions can help ensure reliable fermentation.
The important point is to protect yeast from excessive heat and moisture before you are ready to make the dough.
Can You Make Outdoor Boys Bread Without Sugar?
Yes. Sugar is not essential for creating bread structure, although it can contribute sweetness and support fermentation.
If you prefer a less sweet bread, you can reduce the sugar.
The final flavor will depend on the flour, fermentation, cooking fat, and toppings.
Can You Make It Without Butter?
Absolutely.
Use a neutral cooking oil for frying the bread if butter is unavailable. Olive oil can also work, although it will contribute its own flavor.
Butter is particularly appealing for this recipe because it adds richness and helps the exterior brown beautifully.
Can You Make Outdoor Boys Bread Without Yeast?
You can create a different quick bread or flatbread without yeast, but it will not have the same texture as the traditional yeast-based version.
Yeast fermentation contributes to the airy structure and characteristic bread flavor.
If you remove yeast, baking powder can be used in a separate quick-bread formula, but the result should be considered a variation rather than the classic Outdoor Boys bread recipe.
How to Store the Dry Mix for Camping
Prepare the dry ingredients at home and place them in a clean, sealed food-safe container or bag.
Keep the mixture dry until you are ready to add water.
Avoid leaving the mixture exposed to humidity because moisture can affect flour quality and activate yeast prematurely.
For longer trips, consider packing ingredients in individual sealed portions so you only open what you need.
Outdoor Boys Bread Camping Packing List
| Item | Why You Need It |
|---|---|
| Bread flour | Main dough ingredient |
| Yeast | Fermentation |
| Salt | Flavor |
| Sugar | Optional sweetness and fermentation support |
| Water | Dough hydration |
| Oil or butter | Cooking |
| Honey | Honey butter |
| Small bowl | Mixing |
| Food-safe bag | Easy dough preparation |
| Skillet or griddle | Cooking |
| Spatula | Turning bread |
| Clean cloth or cover | Protecting dough |
| Fire-safe cooking equipment | Outdoor cooking |
Tips for Making the Best Outdoor Boys Bread Recipe
Use the Right Water Temperature
Warm water helps yeast become active, but extremely hot water can damage it. Aim for comfortably warm water rather than boiling or very hot water.
Do Not Add Too Much Flour
A common beginner mistake is adding too much flour because the dough feels sticky.
A soft dough can be easier to cook into tender bread. Add flour gradually only when the dough is genuinely difficult to handle.
Give the Dough Enough Time
Yeast needs time to work. If the weather is cold, fermentation may take longer.
Do not rush the rising stage simply because the recipe says a particular number of hours.
Control the Fire
A roaring fire is not automatically better for cooking bread.
Strong direct heat can burn the exterior while leaving the center undercooked. Medium, controlled heat is usually easier to manage.
Cook Smaller Pieces
Small portions are easier to flip and cook evenly.
They also allow everyone at camp to enjoy fresh bread rather than waiting for one large loaf to finish.
Keep the Cooking Surface Clean
Remove burned flour or dough between batches if necessary.
A clean skillet gives the bread a better flavor and reduces unwanted burnt particles.
Common Outdoor Boys Bread Mistakes
Mistake 1: Using Water That Is Too Hot
Very hot water can interfere with yeast activity. Use warm water instead.
Mistake 2: Cooking Over Excessive Flame
Direct flames can quickly burn bread. Use controlled heat and, when possible, hot coals.
Mistake 3: Making the Dough Too Thick
Thick pieces can brown outside before the center is completely cooked.
Flatten the dough to a practical thickness.
Mistake 4: Skipping the Rise
Yeast bread needs fermentation. Skipping or drastically shortening the rising stage can result in dense bread.
Mistake 5: Adding Too Much Flour
Excess flour can produce a heavy, dry texture.
Mistake 6: Walking Away From the Pan
Campfire cooking changes quickly. Stay close and monitor the bread.
How to Know When the Bread Is Done
The bread should have a browned exterior and feel cooked rather than doughy in the center.
If you are unsure, gently open the thickest part of a test piece. The inside should not contain wet, raw dough.
Because cooking temperatures vary outdoors, visual inspection is more useful than following an exact cooking time alone.
Outdoor Boys Bread With Honey Butter
Honey butter is one of the easiest ways to make this bread feel special.
The warm bread softens the butter and allows the honey to spread easily across the surface.
For an extra breakfast-style meal, serve it with fruit, eggs, bacon, or another favorite camping breakfast.
Outdoor Boys Bread With Blueberry Topping
A sweet variation is to serve the cooked bread with blueberry topping.
The combination works because the lightly salty, toasted bread contrasts with the sweet fruit.
Savory Outdoor Boys Bread Variations
You can easily turn the basic bread into a savory camping snack.
Try adding small amounts of dried herbs, garlic seasoning, grated cheese, or cracked black pepper after cooking.
For a cheesy version, sprinkle cheese over the warm bread and allow it to melt.
For garlic bread, brush the cooked bread with melted butter mixed with garlic seasoning.
Sweet Outdoor Boys Bread Variations
The basic dough can also become a dessert-style camping treat.
Serve the warm bread with honey, cinnamon sugar, fruit preserves, chocolate spread, or berry topping.
Because the bread itself is not heavily sweetened, it works well with both sweet and savory toppings.
How to Make the Recipe More Camping-Friendly
The easiest strategy is to prepare everything possible at home.
Measure the flour, yeast, salt, and sugar before leaving. Pack the dry mix in one sealed container. Pack the cooking fat separately.
At camp, all you need to do is add water, mix, allow the dough to rise, and cook.
This approach reduces cleanup and makes the recipe practical for hiking or remote camping.
How Long Does Outdoor Boys Bread Last?
Fresh bread is best eaten shortly after cooking.
If you have leftovers, allow them to cool and place them in a clean airtight container or food-safe bag.
At room temperature, homemade bread is generally best consumed relatively quickly, especially in warm outdoor conditions. For longer storage, follow appropriate food-safety practices and keep perishable toppings such as butter mixtures protected from heat.
Outdoor Boys Bread Recipe for Kids
This recipe can be a fun family camping activity because children can participate in measuring ingredients, mixing the dough, flattening dough pieces, and spreading honey butter.
However, children should not handle hot skillets, boiling water, or open flames without close adult supervision.
A good family approach is to let children prepare the dough while an adult handles the fire and cooking surface.
Is Outdoor Boys Bread Good for Hiking?
Yes, especially as a freshly prepared camp meal.
The ingredients are relatively simple to carry, and the dry mixture can be prepared ahead of time.
For longer hikes, however, remember that flour and cooking equipment add weight. The recipe is most practical when you already have a camping setup suitable for cooking.
Outdoor Boys Bread Recipe Nutrition
The exact nutritional value depends on the flour, amount of oil or butter, portion size, and toppings.
The basic bread provides carbohydrates from flour and some protein. Butter adds fat, while honey contributes additional carbohydrates and sweetness.
For precise nutritional information, calculate the recipe using the exact brands and quantities you use.
What is the Outdoor Boys bread recipe?
The Outdoor Boys bread recipe is a simple rustic bread made with basic ingredients such as flour, yeast, salt, sugar, and warm water. It is especially suitable for camping because it can be cooked in a skillet or griddle instead of a conventional oven.
What ingredients are needed for Outdoor Boys bread?
You typically need bread flour, active dry yeast, salt, sugar, warm water, and a little butter or oil for cooking. Honey and butter can also be used as a topping.
Can I make Outdoor Boys bread without an oven?
Yes. One of the best things about this recipe is that you can cook the dough in a skillet, cast-iron pan, or griddle over controlled heat.
How long does Outdoor Boys bread dough need to rise?
The rising time depends on temperature and yeast activity. In a warm environment, the dough may rise within a few hours, while colder camping conditions can require considerably more time.
Can I prepare the Outdoor Boys bread dough ahead of time?
Yes. You can prepare the dry ingredients at home and pack them in an airtight food-safe bag or container. Add the water when you are ready to make the dough.
What flour is best for the Outdoor Boys bread recipe?
Bread flour is an excellent choice because it provides good gluten development and creates a pleasantly chewy texture. All-purpose flour can also be used.
Why is my bread burnt outside but raw inside?
The cooking surface may be too hot, or the dough pieces may be too thick. Lower the heat and make smaller, flatter pieces so they cook more evenly.
Can I cook Outdoor Boys bread on a regular stove?
Yes. A heavy skillet over medium heat works very well and gives you much better temperature control than an open campfire.
Can I make Outdoor Boys bread without sugar?
Yes. Sugar is optional in many bread variations. Removing it will make the bread less sweet and may slightly change the fermentation and browning.
Can I make a sweet version of Outdoor Boys bread
Yes. Cheese can be added to the dough as a variation or melted over the cooked bread. Cheddar, mozzarella, or another flavorful cheese can work well.
How do I know when Outdoor Boys bread is fully cooked?
The outside should be golden brown and the inside should no longer look wet or doughy. If you are unsure, cut open the thickest piece and check the center before serving.