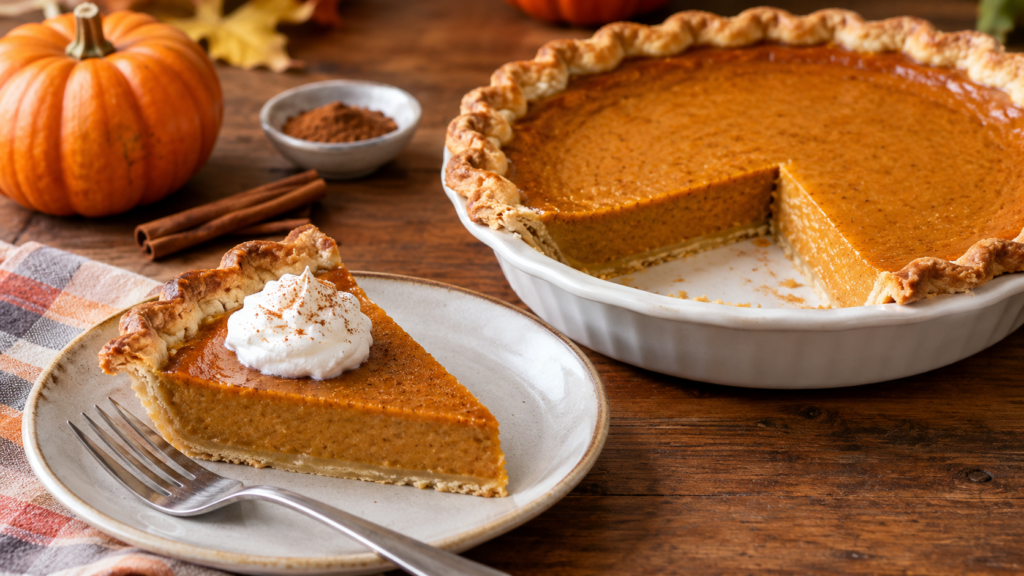

A classic pumpkin pie recipe creates a creamy, warmly spiced dessert. Its crisp pastry contrasts beautifully with the smooth pumpkin filling. The filling combines pumpkin puree, eggs, cream, sugar, and gentle spices. Each slice tastes rich, comforting, and pleasantly balanced without excessive sweetness. This pie suits autumn gatherings, Sunday lunches, and festive celebrations. It can also become a thoughtful homemade dessert for guests.
This recipe uses simple ingredients that are widely available across Britain. A buttery shortcrust pastry provides a delicate base for the filling. Ground cinnamon, ginger, and nutmeg create the familiar seasonal flavour. Proper cooling helps the custard filling become firm and beautifully sliceable.
The pie is best served slightly chilled or at room temperature. A spoonful of softly whipped cream makes each serving especially inviting. Careful baking prevents cracks while preserving the filling’s silky texture. Follow the visual cues below for consistently reliable results.
Recipe Information
| Recipe Information | Details |
|---|---|
| Preparation Time | 30 minutes |
| Chilling Time | 30–45 minutes |
| Blind Baking Time | 15 minutes |
| Filling Baking Time | 40–50 minutes |
| Total Time | Approximately 2 hours |
| Servings | 8 slices |
| Difficulty | Moderate |
| Cuisine | British-inspired adaptation of a classic American pie |
| Cooking Method | Oven baking |
| Best Served | Room temperature or lightly chilled |
About This Pumpkin Pie Recipe
Pumpkin pie is a custard-style dessert made with pumpkin puree. The filling is usually enriched with eggs, dairy, sugar, and spices. Traditional American versions became especially associated with autumn celebrations. In Britain, pumpkin pie offers an appealing way to use seasonal pumpkins.
The flavour is gently sweet, creamy, earthy, and warmly spiced. Pumpkin itself has a mild flavour that welcomes cinnamon and ginger. Nutmeg contributes a subtle aromatic note without overwhelming the filling. A small amount of salt helps balance the sweetness and spices.
The pastry is equally important for achieving a satisfying finished pie. A buttery shortcrust base provides crispness against the soft filling. Blind baking helps the pastry remain firm beneath the moist custard. This step also reduces the risk of a soggy bottom.
Pumpkin pie is particularly popular during autumn and festive occasions. It works beautifully after a traditional Sunday roast or seasonal dinner. You can prepare the pastry and filling separately before baking. This makes the dessert practical when entertaining several guests.
What Makes Pumpkin Pie Special?
The contrast between pastry and filling gives this dessert its character. The crust should remain tender, crisp, and lightly golden. Meanwhile, the filling should stay creamy rather than becoming rubbery.
The spices should support the pumpkin instead of dominating it. Cinnamon provides warmth, while ginger adds gentle brightness. Nutmeg gives the finished pie a rounded, aromatic background.
Another important characteristic is the filling’s delicate setting. Pumpkin pie should wobble slightly when removed from the oven. The residual heat continues cooking the centre while cooling. This prevents excessive baking and helps maintain a smooth texture.
Ingredients
For the Shortcrust Pastry
| Ingredient | Quantity | Purpose |
|---|---|---|
| Plain flour | 250g | Forms the pastry structure |
| Cold unsalted butter | 125g | Adds richness and flakiness |
| Caster sugar | 25g | Adds slight sweetness |
| Fine salt | Small pinch | Balances the flavour |
| Cold water | 3–5 tbsp | Brings the pastry together |
For the Pumpkin Filling
| Ingredient | Quantity | Purpose |
|---|---|---|
| Pumpkin puree | 425g | Provides the main flavour and body |
| Double cream | 180ml | Creates richness and smoothness |
| Light brown sugar | 100g | Adds sweetness and caramel notes |
| Large eggs | 2 | Helps set the custard |
| Ground cinnamon | 1½ tsp | Provides warm spice |
| Ground ginger | 1 tsp | Adds gentle heat and freshness |
| Ground nutmeg | ½ tsp | Adds aromatic depth |
| Vanilla extract | 1 tsp | Rounds out the flavour |
| Fine salt | ¼ tsp | Balances sweetness |
| Ground cloves | ⅛ tsp | Adds optional festive warmth |
Choosing the Pumpkin
Use a naturally sweet eating pumpkin rather than a decorative variety. Sugar pumpkin, Crown Prince, or similar cooking pumpkins work well. Good-quality canned pumpkin puree also produces reliable results.
If using fresh pumpkin, choose firm flesh without excessive watery areas. Roast the pumpkin until completely tender before pureeing it. Strain very wet puree to remove excess moisture.
Choosing the Pastry
Cold butter is essential for a good shortcrust texture. Keep the butter chilled until you begin mixing. Avoid adding too much water because this can make pastry tough.
Plain flour provides enough structure without making the crust overly dense. Caster sugar gives the pastry a gentle sweetness. A small amount of salt improves the overall flavour.
Ingredient Substitutions
| Original Ingredient | Possible Substitute | Expected Difference |
|---|---|---|
| Double cream | Whipping cream | Slightly lighter richness |
| Light brown sugar | Soft dark brown sugar | Deeper caramel flavour |
| Unsalted butter | Salted butter | Slightly saltier pastry |
| Plain flour | Plain gluten-free flour blend | Different pastry texture |
| Fresh pumpkin | Good-quality pumpkin puree | Similar flavour and texture |
| Caster sugar | Granulated sugar | Slightly slower dissolving |
| Double cream | Evaporated milk | Lighter, less rich filling |
Avoid replacing the eggs because they provide essential custard structure. Plant-based cream can work, but the final texture may differ. Gluten-free pastry also requires careful handling because it can crumble more easily.
Equipment Needed
- 23cm loose-bottomed pie tin
- Large mixing bowl
- Medium mixing bowl
- Rolling pin
- Baking parchment
- Baking beans or dried pulses
- Wire cooling rack
- Fine sieve
- Balloon whisk
- Measuring spoons
- Kitchen scales
- Food processor, optional
- Pastry brush, optional
A loose-bottomed tin makes removing the finished pie easier. Baking beans help keep the pastry base flat during blind baking. A sieve is useful when homemade pumpkin puree contains fibrous pieces.
Preparation Before Cooking
Good preparation makes this pumpkin pie recipe easier to manage. Organise the pastry ingredients before beginning any mixing.
- Measure the ingredients accurately. Use kitchen scales for flour, butter, sugar, and pumpkin puree.
- Chill the butter and water. Cold ingredients help create a tender shortcrust pastry.
- Prepare the pumpkin puree. Homemade puree should be smooth and reasonably thick before use.
- Check the oven. Make sure the oven heats evenly before baking the pastry.
- Prepare the pie tin. Lightly grease the sides and base where necessary.
- Clear enough refrigerator space. The pastry needs chilling before rolling and baking.
- Prepare baking parchment. Cut a piece large enough to cover the pastry.
- Have baking beans ready. These prevent the pastry from puffing during blind baking.
For homemade pumpkin puree, roast pumpkin pieces at 190°C fan for approximately 35–45 minutes. The flesh should become completely tender and easily pierced. Cool the pumpkin before blending it into a smooth puree.
If the puree appears watery, place it inside a fine sieve. Let excess moisture drain for approximately 15–30 minutes. Thick puree produces a more dependable custard consistency.
Step-by-Step Pumpkin Pie Recipe
Step 1: Make the Shortcrust Pastry
Place the plain flour, caster sugar, and salt inside a large bowl. Add the cold butter cut into small cubes. Rub the butter into the flour using cool fingertips.
Continue until the mixture resembles fine breadcrumbs with several small butter pieces. Avoid working the mixture excessively because warmth can soften the butter. The mixture should feel cool rather than greasy.
Add three tablespoons of cold water and mix gently. Add another spoonful only when the dough remains crumbly. Stop adding water once the dough begins forming large clumps.
Press the mixture together without kneading it like bread dough. The finished pastry should hold together without feeling sticky. Overworked pastry can become firm after baking.
Shape the pastry into a flat disc rather than a thick ball. Wrap it securely and refrigerate for approximately 30 minutes. Chilling relaxes the gluten and firms the butter again.
Step 2: Prepare the Pumpkin Filling
Place the pumpkin puree inside a large mixing bowl. Add the light brown sugar, cinnamon, ginger, nutmeg, and salt. Add the optional ground cloves if you prefer stronger festive spice.
Whisk the ingredients gently until the sugar becomes evenly distributed. Add the eggs and whisk until they are completely incorporated. Avoid vigorous whisking because excessive air can create bubbles.
Pour in the double cream and vanilla extract gradually. Continue mixing until the filling becomes smooth and uniform. The finished mixture should look thick, glossy, and pourable.
Check the consistency before baking the filling. It should flow easily from the whisk without appearing watery. If using homemade puree, moisture levels can vary considerably.
Step 3: Roll the Pastry
Remove the chilled pastry from the refrigerator. Allow it to sit for approximately five minutes before rolling. This brief rest makes cracking less likely.
Lightly flour the work surface and rolling pin. Roll the pastry outward from the centre using gentle pressure. Turn the pastry frequently to maintain an even thickness.
Aim for approximately 3–4mm thickness across the entire pastry. The pastry should become wide enough to cover the pie tin. Leave enough excess pastry around the edges for trimming.
Lift the pastry carefully using the rolling pin or both hands. Lower it into the tin without stretching the dough. Stretching can cause the pastry to shrink during baking.
Press the pastry gently into the corners and sides. Do not force it into position because this can create thin areas. Trim excess pastry while leaving a small border above the rim.
Step 4: Chill the Pastry Again
Place the lined pie tin inside the refrigerator. Chill it for approximately 20–30 minutes before baking. This second chilling period helps the pastry hold its shape.
Meanwhile, preheat the oven to 190°C conventional or 170°C fan. Allow the oven to reach temperature before starting blind baking.
Do not skip this chilling stage when your kitchen feels warm. Soft pastry is more likely to collapse during baking. Firm pastry generally produces cleaner edges and a flatter base.
Step 5: Blind Bake the Pastry
Remove the chilled pastry from the refrigerator. Place a sheet of baking parchment over the pastry. Fill the parchment with baking beans or dried pulses.
Bake the pastry at 190°C conventional or 170°C fan for approximately 15 minutes. The edges should look firm while the centre remains pale.
Carefully remove the parchment and baking beans after fifteen minutes. Return the pastry to the oven for another 5–8 minutes. Continue until the base looks dry and lightly golden.
Watch the edges carefully during this stage. They should not become dark brown before the filling is added. If necessary, cover the edges loosely with foil.
Step 6: Reduce the Oven Temperature
Once the pastry has been blind baked, reduce the oven temperature. Set it to 170°C conventional or 150°C fan.
Allow the oven temperature to stabilise briefly before adding the filling. A very hot oven can cause the custard to cook unevenly.
The pastry can remain warm while you prepare the filling. However, it should not contain visible moisture or raw dough. A lightly golden base provides the best foundation.
Step 7: Fill the Pastry Case
Place the blind-baked pastry case on a stable baking tray. This makes transferring the filled pie much easier. It also catches accidental spills during baking.
Pour the pumpkin filling slowly into the pastry case. Stop slightly below the pastry rim to prevent overflowing. If bubbles appear, gently tap the tray once against the worktop.
Avoid aggressively shaking the pie because this can damage the pastry edges. Small surface bubbles can also be removed using a clean spoon. Keep the movement gentle and controlled.
Step 8: Bake the Pumpkin Pie
Carefully transfer the filled pie into the oven. Bake at 170°C conventional or 150°C fan for approximately 40–50 minutes.
The exact time depends on the depth of your pie and oven. Begin checking the filling around the forty-minute mark. Avoid opening the oven repeatedly because temperature changes can affect baking.
The outer filling should appear set and slightly puffed. The centre should still have a gentle wobble when the tin moves. It should not look liquid or ripple like uncooked cream.
Do not wait until the entire surface becomes completely firm. The centre continues cooking from residual heat after removal. Overbaking can cause cracks and a grainy custard texture.
Step 9: Check for Doneness
Look closely at the centre of the pie before removing it. A small controlled wobble indicates that the custard remains moist. The outer two-thirds should appear visibly set.
You can also insert a thin knife near the centre. It should come out mostly clean without carrying liquid filling. Avoid repeatedly piercing the pie because this can create unnecessary cracks.
The pastry edges should appear golden and dry. The filling should have a warm orange-brown appearance. A few small surface marks are completely normal.
If the filling remains visibly liquid, continue baking for five minutes. Check again using the same gentle wobble test. Avoid increasing the oven temperature to speed up cooking.
Step 10: Cool the Pie Properly
Remove the baked pie from the oven and place it on a cooling rack. Leave it undisturbed for at least two hours. The filling will continue setting as it cools.
Do not cut the pie while it is still hot. Warm custard is softer and may collapse when sliced. Cooling also allows the spices to taste more balanced.
Once cooled, refrigerate the pie if you prefer a firmer texture. Cover it loosely until the surface has cooled completely. Avoid trapping heavy condensation against the filling.
Step 11: Slice and Serve
Use a sharp knife to cut the chilled or room-temperature pie. Wipe the knife between slices for cleaner presentation. Cut through the pastry using steady downward pressure.
Serve each slice with softly whipped cream if desired. A small dusting of cinnamon can provide an attractive finishing touch. Avoid adding excessive toppings because they can hide the pumpkin flavour.
The finished filling should feel creamy and smooth against the crisp pastry. The spices should remain noticeable without becoming overpowering. The crust should provide a gentle buttery contrast.
Cooking Tips
- Use thick pumpkin puree for a properly set filling.
- Keep pastry ingredients cold from beginning to end.
- Avoid adding excessive water during pastry preparation.
- Chill the pastry after shaping it inside the tin.
- Blind bake the crust before adding the pumpkin mixture.
- Reduce the oven temperature before baking the filling.
- Avoid over-whisking because trapped air can create surface bubbles.
- Bake until the centre has a gentle, controlled wobble.
- Cool the pie completely before attempting clean slices.
- Use freshly opened spices for stronger and more balanced flavour.
- Let refrigerated pie stand briefly before serving.
- Use a baking tray beneath the pie for easier handling.
Common Mistakes and How to Fix Them
| Problem | Possible Cause | Solution |
|---|---|---|
| Soggy pastry base | Insufficient blind baking | Bake the crust until visibly dry |
| Cracked filling | Overbaking | Remove the pie while the centre still wobbles |
| Watery filling | Excess moisture in pumpkin puree | Drain or strain the puree beforehand |
| Tough pastry | Overworking the dough | Mix only until the dough comes together |
| Shrinking pastry | Dough was stretched | Press gently without pulling the pastry |
| Burnt pastry edges | Excessive oven heat | Protect edges with foil when necessary |
| Lumpy filling | Poorly mixed ingredients | Whisk gently until completely smooth |
| Very sweet filling | Excessive sugar | Measure sugar accurately |
| Weak spice flavour | Old spices | Use fresh ground spices |
| Pie difficult to slice | Insufficient cooling | Cool completely before cutting |
| Surface bubbles | Excessive whisking | Mix gently and remove visible bubbles |
| Filling remains liquid | Underbaking | Continue baking in five-minute intervals |
Why Does Pumpkin Pie Crack?
Cracking usually happens when the custard becomes too hot. Excessive baking causes the proteins from the eggs to tighten. This creates a firmer texture and can split the surface.
The simplest prevention method involves watching the centre carefully. Remove the pie while the centre still has a gentle wobble. Cooling will complete the setting process naturally.
Why Is the Bottom Soggy?
Pumpkin filling contains considerable moisture, which can soften pastry. Blind baking creates a protective structure before the filling enters the crust.
Thick pumpkin puree also helps reduce excess liquid. Always drain watery homemade puree before preparing the custard.
Pumpkin Pie Recipe Variations
Classic Spiced Pumpkin Pie
Use cinnamon, ginger, nutmeg, and cloves for a traditional warm flavour. Keep the spice quantities balanced so pumpkin remains noticeable.
This version works especially well during autumn gatherings. Serve it with lightly whipped cream for a simple presentation.
Maple Pumpkin Pie
Replace part of the brown sugar with pure maple syrup. Use approximately 70g maple syrup and reduce the sugar slightly.
Maple syrup adds a deeper sweetness with gentle caramel notes. The filling may become slightly softer because syrup adds additional liquid.
Orange and Pumpkin Pie
Add one teaspoon of finely grated orange zest to the filling. Orange zest adds freshness against the warm spices.
Avoid adding large amounts of orange juice because extra liquid changes consistency. The zest provides enough citrus character without disturbing the custard balance.
Ginger-Forward Pumpkin Pie
Increase the ground ginger slightly for a warmer, livelier flavour. You can also add finely chopped stem ginger for stronger texture.
Stem ginger introduces small sweet pieces throughout the creamy filling. Use it sparingly so the pumpkin flavour remains prominent.
Gluten-Free Pumpkin Pie
Use a reliable gluten-free plain flour blend for the pastry. Choose a blend specifically designed for shortcrust pastry when possible.
Gluten-free dough can crumble more easily during rolling. Roll it between parchment sheets when handling becomes difficult.
Crustless Pumpkin Pie
Skip the pastry entirely and bake the filling inside a greased pie dish. Reduce the cooking time slightly because the filling has different exposure to heat.
The result resembles a soft pumpkin custard rather than traditional pie. This version is useful when you want a lighter preparation.
Mini Pumpkin Pies
Divide the pastry and filling among individual tart tins. Reduce the baking time because smaller portions cook faster.
Start checking the pies after approximately twenty-five minutes. Their centres should still show a slight wobble when removed.
Serving Suggestions
Pumpkin pie is delicious when served simply and without excessive decoration. The warm spices already provide plenty of aromatic character.
- Serve slices with softly whipped double cream.
- Add a small spoonful of vanilla ice cream.
- Sprinkle lightly with ground cinnamon.
- Add toasted pecans for gentle crunch.
- Serve with a warm cup of tea or coffee.
- Offer smaller slices after a substantial meal.
- Serve slightly chilled for a firmer texture.
- Serve at room temperature for a softer custard texture.
For festive presentation, place the pie on a simple ceramic serving plate. Add whipped cream separately rather than covering the entire surface. This keeps the pastry visible and preserves its crisp appearance.
Storage and Reheating
Pumpkin pie contains eggs and dairy, so proper refrigeration is important. Allow the freshly baked pie to cool before refrigerating it.
| Storage Method | Approximate Duration | Recommended Method |
|---|---|---|
| Refrigerator | 3–4 days | Cover and keep chilled |
| Freezer | Up to 1 month | Wrap securely and freeze |
| Room Temperature | Avoid extended storage | Refrigerate after cooling |
| Individual slices | 3–4 days refrigerated | Store in airtight containers |
Refrigerating Pumpkin Pie
Place completely cooled pie inside the refrigerator. Cover it loosely with food-safe wrap or foil. Avoid pressing covering directly onto the filling.
For best texture, allow refrigerated slices to sit for approximately fifteen minutes. This slightly softens the custard without leaving it unrefrigerated for long periods.
Freezing Pumpkin Pie
Freeze the fully cooled pie before adding whipped cream. Wrap the pie tightly using suitable freezer wrap. Add a second protective layer to reduce freezer odours.
Freeze for up to one month for the best quality. Thaw the pie overnight inside the refrigerator. Do not thaw it for extended periods at room temperature.
Reheating Pumpkin Pie
Pumpkin pie is usually best served chilled or at room temperature. If you prefer it warm, reheat individual slices gently.
Place one slice in a low oven around 150°C conventional. Warm it for approximately 10–15 minutes until comfortable to serve. Avoid high temperatures because they can soften the pastry excessively.
Microwaving is possible, but the pastry may become softer. Heat one slice for approximately 15–20 seconds at medium power. Check the temperature before adding more heating time.
Nutrition Information
The following figures are approximate estimates for one eighth of the pie. Actual values vary with ingredients and portion size.
| Nutrient | Approximate Amount Per Slice |
|---|---|
| Calories | 390–430 kcal |
| Protein | 7–8g |
| Carbohydrates | 45–50g |
| Fat | 20–23g |
| Fibre | 2–3g |
| Sugar | 22–26g |
| Sodium | 180–240mg |
These figures include both pastry and pumpkin filling. They exclude optional whipped cream or ice cream. Homemade pumpkin puree and different pastry ingredients can change the final values.
Expert Tips for Better Results
Control Pumpkin Moisture
Pumpkin moisture varies significantly between varieties and preparation methods. Roasted pumpkin generally produces more concentrated flavour than boiled pumpkin.
If your puree looks loose, strain it before making the filling. Thick puree produces better custard structure and reduces soggy pastry risk.
Avoid Overworking the Pastry
Shortcrust pastry benefits from minimal handling during preparation. Excessive mixing develops gluten and warms the butter.
Work quickly using cool hands whenever possible. If the dough becomes soft, refrigerate it before continuing.
Blind Bake Properly
Blind baking is one of the most important steps for this recipe. A partially baked crust can become soft after absorbing pumpkin filling.
Do not remove the crust too early. The base should look dry and lightly golden before filling.
Use the Correct Doneness Cue
Time alone should never determine when pumpkin pie is finished. Ovens vary, and pie depth also affects cooking speed.
The gentle-wobble test provides a more reliable visual indicator. The edges should be set while the centre remains slightly mobile.
Cool Without Disturbing the Custard
The filling continues setting during cooling. Moving or cutting the pie too soon can damage its structure.
Place the pie on a cooling rack and leave it undisturbed. This produces cleaner slices and a smoother final texture.
Balance the Spices
Pumpkin has a delicate flavour that can disappear under excessive spice. Measure each spice carefully instead of adding large amounts instinctively.
Fresh cinnamon and ginger provide stronger flavour than old spices. Taste the raw filling carefully before baking if desired.
Choose the Right Serving Temperature
Room-temperature pie has a softer, creamier filling. Chilled pie offers firmer slices and a slightly more pronounced spice flavour.
Choose the temperature according to your preferred texture. Both serving styles work well with whipped cream.
Can I make this pumpkin pie recipe ahead of time?
Yes, pumpkin pie works very well when prepared ahead. Bake the pie completely and cool it before refrigeration. Keep it covered inside the refrigerator until serving time. This can make entertaining considerably easier.
Can I use canned pumpkin puree?
Yes, good-quality canned pumpkin puree is convenient and reliable. Choose plain pumpkin puree without added sugar or spices. Pumpkin pie filling should not be used because its ingredients differ.
Can I make pumpkin puree from fresh pumpkin?
Yes, fresh pumpkin works beautifully when prepared correctly. Roast pumpkin until the flesh becomes completely tender. Blend the cooled flesh until smooth, then drain excess moisture when necessary.
Why did my pumpkin pie crack?
Cracking commonly occurs when the filling becomes overcooked. Excessive heat causes the egg proteins to tighten and split. Remove the pie when the centre still has a gentle wobble.
Can I freeze pumpkin pie?
Yes, pumpkin pie can be frozen successfully for approximately one month. Cool it completely before wrapping it securely. Thaw frozen pie overnight inside the refrigerator before serving.
Should pumpkin pie be refrigerated?
Yes, pumpkin pie should be refrigerated because its filling contains eggs and dairy. Keep the cooled pie covered inside the refrigerator. Consume refrigerated leftovers within approximately three to four days.
Can I make the pastry ahead?
Yes, pastry can be prepared ahead and refrigerated. Keep the wrapped dough chilled until you are ready to roll. Allow a few minutes at room temperature if the dough feels extremely firm.
How do I prevent a soggy pumpkin pie crust?
Blind bake the pastry before adding the pumpkin filling. Make sure the crust looks dry and lightly golden beforehand. Thick pumpkin puree also helps reduce moisture entering the pastry.
Conclusion
This pumpkin pie recipe combines crisp shortcrust pastry with creamy spiced pumpkin filling. Its balanced sweetness makes it suitable for autumn meals and festive occasions. Cinnamon, ginger, and nutmeg provide warmth without hiding the pumpkin’s gentle flavour. The buttery pastry adds essential contrast to the soft custard.
The most important details involve moisture control and careful baking. Use thick pumpkin puree and blind bake the pastry thoroughly. Watch the filling rather than relying only on the cooking time. A gentle centre wobble usually signals that the pie is ready.
Allow the finished pie to cool completely before slicing and serving. This resting period helps the custard become smooth, firm, and beautifully sliceable. Serve it simply with softly whipped cream for a classic finish.